
Good morning all,
Today sees the first of my weekly projects for you to try yourself. It’s a very simple one this week, with not so many “step-by-step” directions but rather more ideas for you to try. I promise that there will be future projects of a more traditional style of instructions for those of you who prefer that, but I thought we would start our journey together with a project that is so simple you can adapt it to suit your own needs and preferences.

So what have I got for you? Well, it’s quite simply a way of taking an old box you don’t know what to do with and turning it into a beautiful keepsake for yourself or as a more permanent way of gift-wrapping. I don’t know about you, but I often think that presents look so nice, all wrapped up, and it is such a shame to rip them open and simply discard the paper (not to mention less than friendly to the environment). I have long been urged to open my presents quicker by those around me, but I do so love the gift wrapping that I cannot bring myself to simply tear into it, and prefer to prise it open at the seams and fold the paper nicely, just in case I can use it again. And that is what has inspired today’s project.
So what did I do? Well, I searched around the house and managed to find several boxes just hanging around, waiting to be used.

There were actually so many boxes I couldn’t fit them all into one picture… so many, in fact, that I didn’t know which one to begin with. As this is a project for you to try, I shall show you the largest and hardest one first, so that we get that over with. Then you will know that there is an even easier option that you can try further down the page!
Let me take a moment here to clarify that, being me, I chose a box that was not the easiest of things to cover. Half way through I thought “why did I choose this box, this is a nightmare…” and yet, the further I went, the more it came together and before long it was a perfect box for sending a gift in. It didn’t really take that long in the end, and it looks pretty good, don’t you think?

I’m telling you this, not to put you off, but to remind you that even if the box doesn’t come out as “perfectly” as you may have hoped, it will still look amazing and you will still be proud of it.
Anyway, there are several ways you could cover your box. If you are good at measuring things precisely and figuring out the logistics of what piece of paper will end up where if you draw a pattern on the paper, then by all means do it that way. I, however, found it easier to measure each end of the box, add an extra couple of centimetres on to each edge and then cut out those squares to stick on first. A few little nicks in each corner, once the centre part had been stuck on to the box, ensured I had a perfect fit over each end.

After that, I grabbed hold of a new piece of wrapping paper in the same design (to ensure it was big enough to cover the box) and started at the top, sticking each side in turn and rolling the box until it was all covered. I hope this makes sense – imagine what you do with a swiss roll, you start at one end and roll the rest of it round.

As you can see, I continued cutting the paper to the exact size of each side as I went. This meant that I got a really close edge each time and you could do the same, so long as you use relatively small scissors. This worked especially well, because I had given each end that extra couple of centimetres to wrap over the edges, meaning that all I had to do at this point was cut along the box’s edge and you could barely see the seam.
The final step was to find a contrasting design to cover the inside of the box. I then followed the same idea I’d used on the outside – cutting and covering the smaller edges first and then using one big piece of paper to cover the larger part of the box, folding it as I went along. The end result was impressive, and something I am sure any girl would love to receive, especially filled with goodies to pamper herself with!

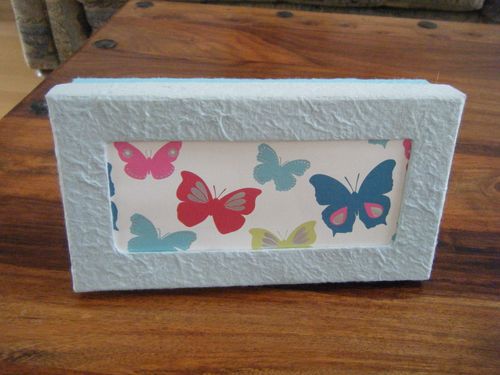
It really is that simple, and although I cannot give you more direct instructions, I do hope you will have a go at this and let me know how you get on. Of course, you don’t always have to start from scratch like this – I did promise you an easier option, remember. Sometimes you will find a box that is already so pretty you hardly have to do a thing to make it reusable. Take this box, for example:

It is already covered in two beautiful handmade blue papers. I have no idea what originally came in it, but I had an idea of how to reuse it. First,the plastic covering originally in that window space was removed, and a new, complementing piece of paper was put in its place.

Once the new paper was securely fastened in, the box became a brand new box. Such a small piece of work, but a lovely result.

These kinds of boxes are often given with bath-time treats and little bottles of perfume at birthdays and Christmas, so why not try and keep hold of a few next time, so you can re-use them for gift giving, or like me, to keep special memories in.

Yes, that is Tim as a baby, isn’t he gorgeous? Would you like to see some more of the photos I recently liberated from his mum for my own collection? Well, as you asked…

Awwww… I wonder if he’ll kill me for this?
Anyway, back to the project. If you’re really lucky, you may even come across a nice little box you need do nothing to, except fill. It might be a box you were given, or one you find in a charity shop, but if you do, how do you know what to fill it with? Well, here are a few ideas:
- a selection of someone’s favourite chocolates
- a “pack of cards” you create, writing a special poem, quotation or special memory on each one
- a sewing kit, with all the essentials, plus some beautiful buttons and thimbles, to make you smile
- a handful of shells you collected at the beach, to remind you of summer in the darkest days of winter, or as a gift for someone too old or ill to make it this year
- a warm scarf you have knitted for a friend who’ll need it
- a pair of bootees for a newborn baby
The list goes on, and there is no limit to what you can create in this way and that is why I just love this idea and wanted to share it with you all. No longer must you wonder how you are going to wrap that awkward shaped present – simply find a box big enough and make it special.

I used my “ready-made” box to keep a bracelet in, one of my latest designs. This one will not be going up for sale in the shop, however, because I am keeping it as a gift for one of you. All you have to do, to be in with a chance of winning this bracelet, is to leave me a comment, letting me know you are here, how you found me, and what you would like to see here in future (would you like more craft projects to try, updates on our life, recipes, gifts to buy… or something completely different). That’s it! The giveaway will end on Tuesday May 18th at Midnight GMT, with the winner being named on Thursday 20th. Please be sure to leave a link back to your own blog or an email address, so that I can contact you if you are the winner.
And don’t forget, if you do not win, you can still buy jewellery as pretty as this bracelet in my shop, more details of which will be given tomorrow.


6 Comments
Keletkezes
April 27, 2010 at 11:03 amTee hee, lovely pictures of Tim! I love covering old boxes with paper: it’s much better when I’m storing stuff in them because it’s easier to write on. And great for presents: simple and effective 😀
simone
April 27, 2010 at 6:01 pmYour new blog looks lovely Amanda! I can’t believe I have only just discovered it and you are 3 posts in already!!! Tim was a very bonny baby! I think this blog should be what you want it to be. Personally I like to see craft projects and recipes and something completely different! Have a lovely birthday week.x
Julie
May 5, 2010 at 7:36 pmHi Amanda – just popped over after your visit to me. I’ve had a quick look back over your ‘old’ blog and think your decision to stop conventional working and try to make a go of things at home is fantastic. I hope it works out well. I just like hearing about what people have been up to and like places where people are just being themselves. I do love recipes too – always needing new ideas. Good luck with everything. Juliex
Amanda
May 13, 2010 at 6:57 pmHey Dawn – good to see you here… Tim didn’t mind in the slightest, thankfully!!
Amanda
May 13, 2010 at 6:59 pmHey Simone!
I have been a busy bunny, so that’s why there are so many posts so quickly… once I get started there’s no stopping me!
Thanks for your input… I have just separated my shop from my blog (though they are still linked) so I can focus my blog on being that bit more personal and less “business-like”, which suits me much better. You know how I like to ramble on sometimes!
Amanda
May 13, 2010 at 7:00 pmHi Julie,
thanks for popping over! I am so glad I gave up the conventional work and look forward to using my extra time filling this space with all those things you mentioned you liked to read about, so thanks for the input! xx